


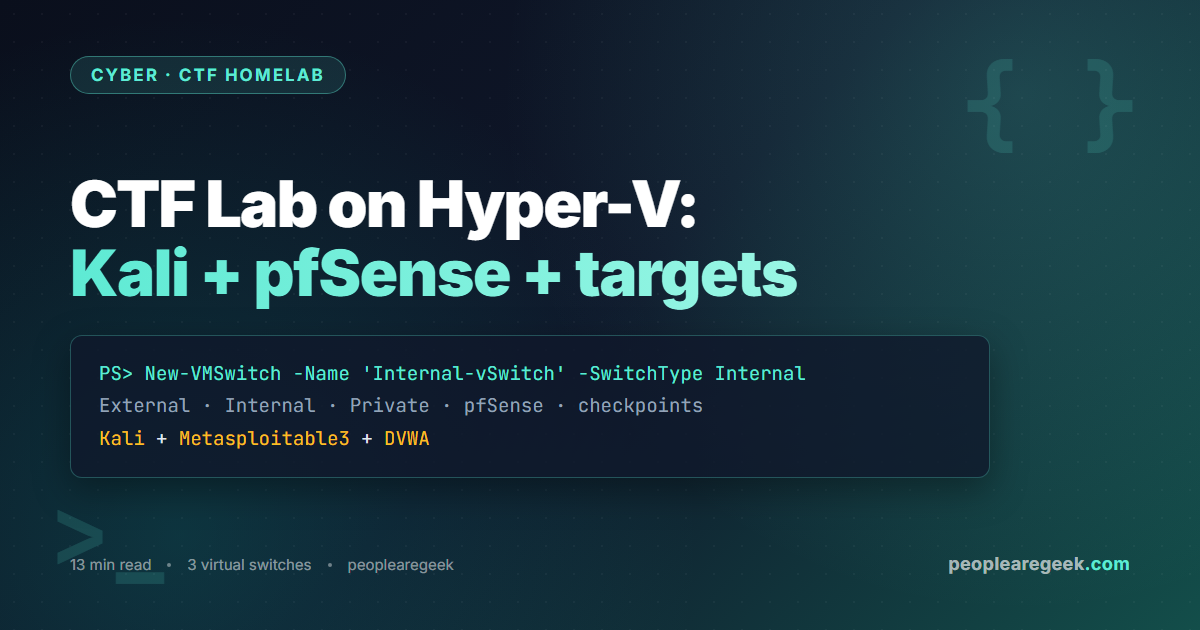
A Capture-The-Flag homelab is the cheapest, fastest way to practice offensive security legally on hardware you already own. This walkthrough builds a complete CTF range on Hyper-V, the free Type-1 hypervisor that ships with Windows 10 and 11 Pro / Education / Enterprise. You will end up with a network of isolated VMs: a Kali Linux attacker, a pfSense router, Metasploitable3 and a deliberately vulnerable Windows 10 as targets, plus a DVWA web app on a fully air-gapped switch. Total disk footprint: ~80 GB. Total build time: an evening.
Contents
- Why a CTF lab on Hyper-V (and not VirtualBox)
- Prerequisites and hardware sizing
- Step 1: Enable Hyper-V the right way
- Step 2: Create the three virtual switches
- Step 3: Build the Kali attacker VM
- Step 4: Add the vulnerable targets
- Step 5: Plug pfSense in for routing and egress control
- Step 6: First exploit run
- Common pitfalls
- FAQ
Why a CTF lab on Hyper-V (and not VirtualBox)
VirtualBox is friendlier on day one. Hyper-V is friendlier on day 30. Three reasons to pick Hyper-V for a CTF range. First, it is a Type-1 hypervisor running directly above the Windows hypervisor layer, so VMs survive host hibernation better and CPU passthrough is straightforward. Second, the Virtual Switch Manager gives you native control over External / Internal / Private network types — the exact model a real lab needs to keep an exploited box from beaconing to the open Internet. Third, you almost certainly have it already: enabling Hyper-V is two checkboxes away on any Windows Pro / Education / Enterprise SKU, no licence to chase.
Two caveats. If you also use VMware Workstation 16 or older you cannot run both at once — Hyper-V wins. And nested virtualisation, which you want for some HTB boxes, requires an Intel VT-x or AMD-V CPU with VBS support; check before you commit.
Prerequisites and hardware sizing
What you need on the host:
- Windows 10 / 11 Pro, Education, or Enterprise. Home SKUs do not ship the Hyper-V role. Upgrading from Home to Pro costs ~99 EUR.
- 16 GB RAM minimum, 32 GB strongly recommended. Running Kali + pfSense + Metasploitable3 + Windows 10 vuln + DVWA at the same time peaks around 11 GB committed.
- SSD with at least 120 GB free. Differencing disks are tempting but make snapshots messy; allocate per-VM dynamic VHDX instead.
- CPU with hardware virtualisation enabled in the BIOS (Intel VT-x + EPT, or AMD-V + RVI). Check with
systeminfo | findstr /i "hyper".
Step 1: Enable Hyper-V the right way
Open PowerShell as administrator and run the canonical enable command. This is faster than clicking through Optional Features and it logs what changed.
Enable-WindowsOptionalFeature -Online -FeatureName Microsoft-Hyper-V -All
Reboot when prompted. After the reboot, verify the role is online and the management console is reachable.
Set those two paths to a non-system drive if you have one — your future self will thank you when you blow away the OS partition without losing the lab. Set-VMHost -VirtualHardDiskPath 'D:\HyperV\VHDs' -VirtualMachinePath 'D:\HyperV\VMs'.
Step 2: Create the three virtual switches
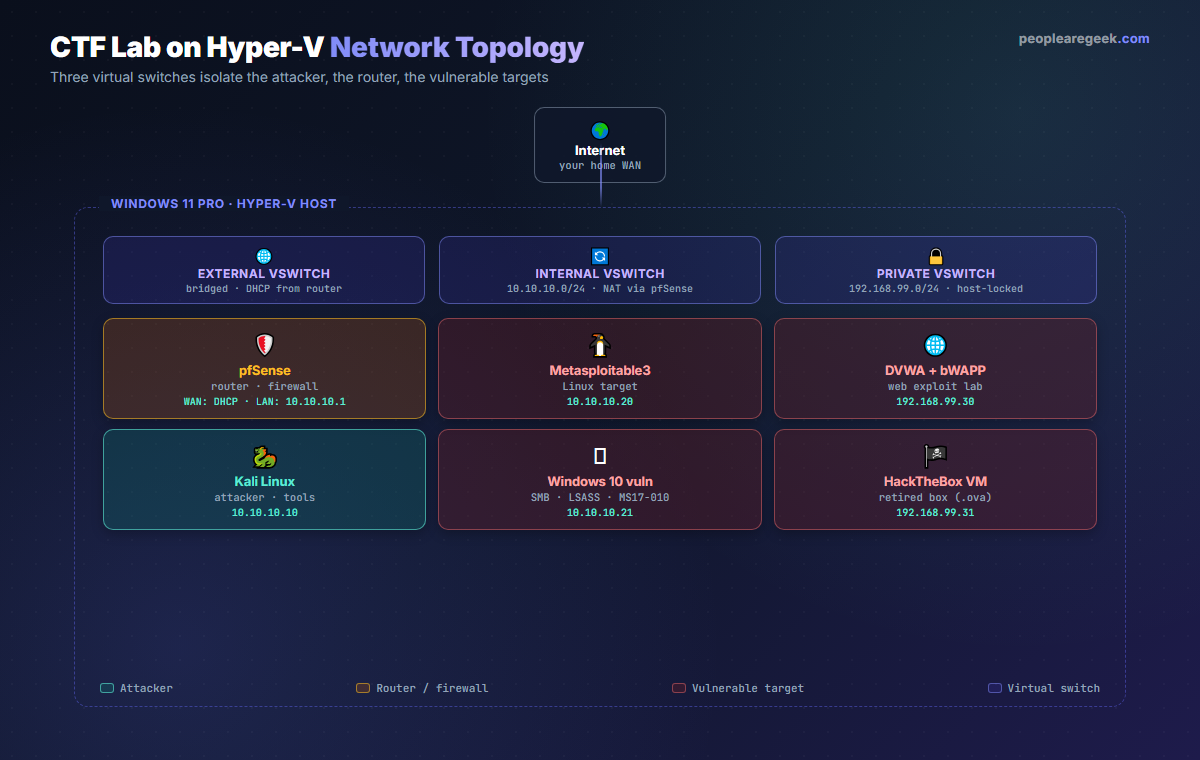
This is the single most important step. The trust boundary between the attacker, the targets, and the wider Internet lives in the virtual switch configuration. Open Hyper-V Manager, then Virtual Switch Manager, and create three switches that match the topology from Figure 1.
# Pure PowerShell equivalent (preferred for reproducibility)
New-VMSwitch -Name 'External-vSwitch' -NetAdapterName 'Ethernet' -AllowManagementOS $true
New-VMSwitch -Name 'Internal-vSwitch' -SwitchType Internal
New-VMSwitch -Name 'Private-vSwitch' -SwitchType Private

# Pin a host-side IP on the internal switch so the host can reach pfSense's web UI
New-NetIPAddress -InterfaceAlias 'vEthernet (Internal-vSwitch)' -IPAddress 10.10.10.5 -PrefixLength 24
A quick recap of what each one does. External bridges your physical NIC, so Kali can download updates and Metasploit databases. Internal connects the host and the VMs but does not touch your home network; pfSense will NAT this subnet out through External. Private is the airlock: nothing in there can reach the host, the home LAN, or the Internet. Park anything you do not fully trust here.
Step 3: Build the Kali attacker VM
Download the official Kali Linux Hyper-V VHDX from kali.org/get-kali/#kali-virtual-machines. The pre-built image saves an hour of installation. Create the VM as Generation 2 (UEFI, easier secure boot toggle), 4 GB RAM, two vCPUs, the Internal-vSwitch as the only adapter for now.
New-VM -Name 'kali-ctf' -MemoryStartupBytes 4GB -Generation 2 `
       -VHDPath 'D:\HyperV\VHDs\kali-linux-2026.2-hyperv-amd64.vhdx' `
       -SwitchName 'Internal-vSwitch'
Set-VM    -Name 'kali-ctf' -ProcessorCount 2 -DynamicMemory `
          -MemoryMinimumBytes 2GB -MemoryMaximumBytes 6GB
Set-VMFirmware -VMName 'kali-ctf' -EnableSecureBoot Off
Start-VM  -Name 'kali-ctf'
Connect via the Hyper-V console once to set keyboard layout and a static IP 10.10.10.10/24 with gateway 10.10.10.1 (pfSense, not yet up — that is fine). On Kali, take a checkpoint before you install any tools — that is your clean baseline.
Step 4: Add the vulnerable targets
The classic starter pack:
- Metasploitable3 (Ubuntu 14.04 + Windows Server 2008, deliberately misconfigured). Build the Vagrant box once on the host, export the Hyper-V VHDX, attach it to a Generation 1 VM with Internal-vSwitch at
10.10.10.20. - Windows 10 vulnerable build — install once, disable Defender, leave SMBv1 on, leave the local Administrator with a weak password. Generation 2, 3 GB RAM, Internal-vSwitch at
10.10.10.21. Take a checkpoint immediately, then a second one after each tooling change. You will revert often. - DVWA + bWAPP web targets — easiest packaged as the OWASP Broken Web Apps VHD, attached to Private-vSwitch at
192.168.99.30. They never leave the host. - Hack The Box retired box — import the OVA via
Convert-VHD, attach to Private-vSwitch at192.168.99.31.
Step 5: Plug pfSense in for routing and egress control
You can run a CTF lab without pfSense, but you would be giving up the most realistic part of the build: a firewall in the middle. Download the pfSense Community Edition ISO, create a Generation 1 VM with two network adapters — one on External, one on Internal — boot from the ISO and install. During the initial console wizard:
- Assign WAN to the External adapter, LAN to the Internal adapter.
- Set LAN IP to
10.10.10.1/24and enable the DHCP server in the same step (range10.10.10.50–10.10.10.99). - Reboot, then load the web UI from Kali at
https://10.10.10.1, default credentialsadmin / pfsense.
Two firewall rules earn their keep on day one: block all traffic from 10.10.10.0/24 to RFC1918 ranges 192.168.0.0/16 and 172.16.0.0/12 (keeps the lab away from your home LAN), and allow outbound TCP 80 / 443 from 10.10.10.10 (the Kali attacker) only. Now Metasploitable3 cannot beacon out, and your Kali box can still pull Empire payloads when you need them.
Step 6: First exploit run
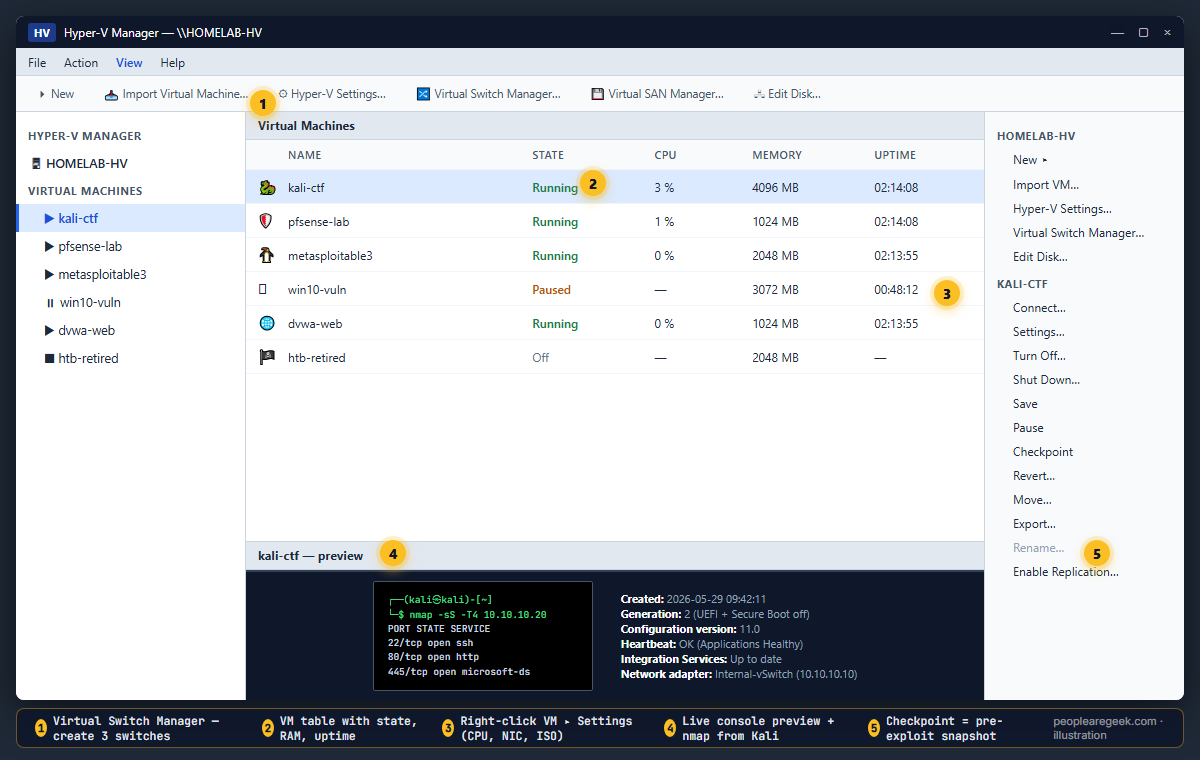
From Kali, scan the Linux target. If the topology is correct, you should see open SSH, HTTP and SMB straight away.
┌──(kali㉿kali)-[~]
└─$ nmap -sS -T4 -p- 10.10.10.20
PORT     STATE SERVICE       VERSION
22/tcp   open  ssh           OpenSSH 6.6.1p1
80/tcp   open  http          Apache 2.4.7
445/tcp  open  microsoft-ds  Samba 4.3.11
3306/tcp open  mysql         MySQL 5.5.46
8080/tcp open  http-proxy    Jetty 9.4.x
Now point Metasploit at the SMB share — Metasploitable3 ships with a guessable vagrant / vagrant account.
msf6 > use auxiliary/scanner/smb/smb_login
msf6 > set RHOSTS 10.10.10.20
msf6 > set SMBUser vagrant
msf6 > set SMBPass vagrant
msf6 > run
If the credentials check, take a checkpoint of every target VM you just touched. This is the single most overlooked discipline in CTF practice — every successful exploit attempt should leave you with a clean revert point, so the next attempt starts from the same baseline.
Common pitfalls
- VBS / Memory Integrity blocks Hyper-V on Windows 11. Disable Memory Integrity under Core Isolation if VM start fails with “operating system cannot find a hardware resource”.
- External switch broke my Wi-Fi. Hyper-V hijacks the physical adapter when you bridge an External vSwitch to Wi-Fi. If you depend on the Wi-Fi NIC, bind External to your Ethernet only and run a USB tether for testing.
- Snapshots are not backups. Hyper-V checkpoints chain on top of the original VHDX. Twenty stacked checkpoints will turn your disk into a 200 GB tarball. Merge or delete the tree every few weeks.
- Generation 1 vs Generation 2 mismatches. Generation 2 VMs need UEFI bootable images. If a target keeps black-screening at boot, recreate it as Generation 1.
- Time drift after sleep. The host suspends fine, but pfSense and Metasploit’s clocks will drift; install
chronyon Linux targets and addw32tm /resyncto a startup script on Windows boxes.
FAQ
Can I run this lab without Pro / Education / Enterprise Windows?
Not natively. Windows Home does not include Hyper-V. Three workarounds: (1) upgrade to Pro (~99 EUR), (2) install Hyper-V Server 2019 free and run the lab headless, or (3) switch to VirtualBox. Option 1 is the cleanest if Windows is your daily driver.
Is Hyper-V better than VMware Workstation for a CTF lab?
For a free, repeatable lab on a Windows host: yes. Hyper-V ships built-in, integrates with PowerShell so the entire lab can be coded as a script, and supports nested virtualisation. VMware Workstation has friendlier USB passthrough and better Linux guest tools, so if you already pay for a Workstation Pro licence and your targets need USB devices, stay with VMware.
How much RAM should I budget?
16 GB is the floor with the core stack (Kali + pfSense + Metasploitable3 + DVWA = ~9 GB committed). 32 GB lets you run a Windows 10 target plus a Hack The Box VM simultaneously, which is the realistic working setup for OSCP-style practice. Dynamic Memory inside each VM also helps.
Can I expose the lab to the Internet for friends to attack?
Technically yes through pfSense port-forwarding. Pragmatically no. A homelab exposed to the open Internet is a CVE waiting to happen, and most ISP terms of service forbid hosting deliberately vulnerable services. Use ZeroTier or Tailscale to bring trusted attackers into the Internal switch over a virtual LAN instead.
Do I need pfSense at all?
No. You can flat-route everything through the Internal vSwitch and rely on the host firewall to keep lab traffic away from your LAN. The pfSense step adds 30 minutes of setup, gives you a real firewall to practice rule-writing against, and produces logs that map cleanly to a SIEM if you later combine this lab with the Wazuh + Suricata SOC homelab.
How do I keep targets up to date without breaking the exploits?
You do not. Patching a deliberately vulnerable box defeats its purpose. Keep Kali updated for tooling, keep pfSense updated for the firewall, but pin the targets at the version that ships with the intended vulnerabilities. Document the exact build in a README beside each VHDX so a future you (or a teammate) can rebuild it.
Ready for detection?
Pair this offensive lab with the SOC homelab walkthrough — Wazuh + Suricata + Elastic Stack — and you have both sides of the kill chain on the same hypervisor.