


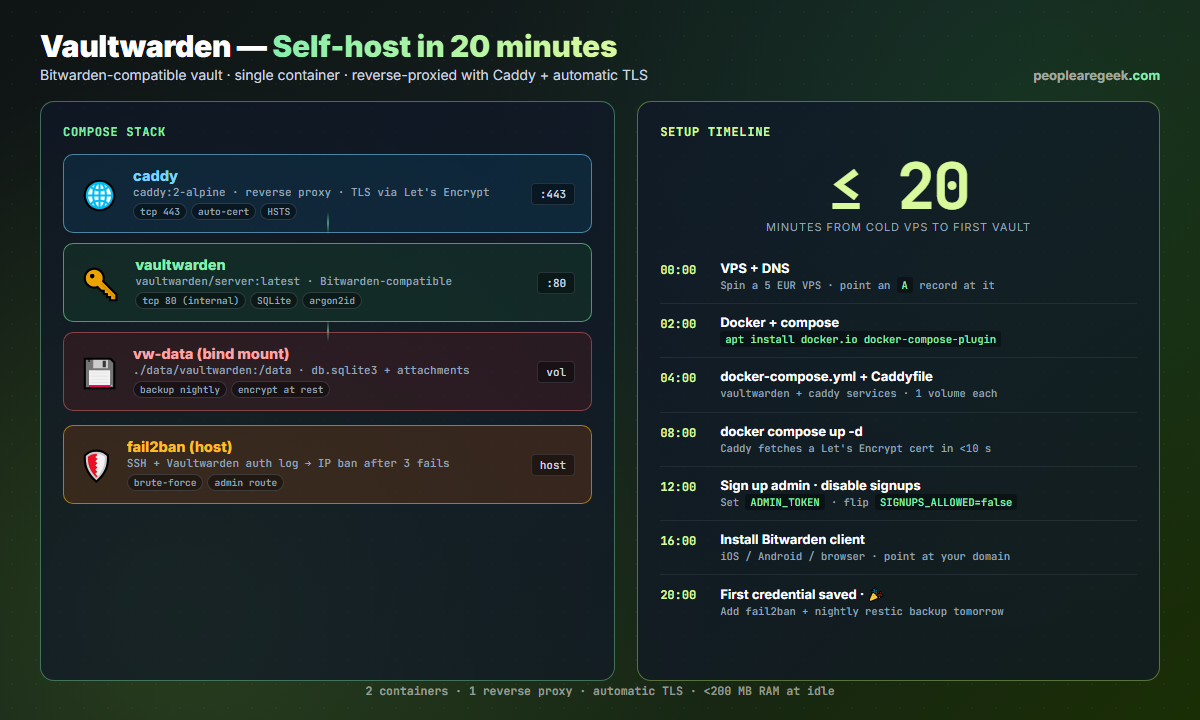
Vaultwarden is the Rust-based, Bitwarden-compatible password server you can self-host in a single Docker container. It speaks the same wire protocol as the official Bitwarden server, so every official client — browser extension, iOS, Android, desktop — works against it without modification. The container weighs about 50 MB on disk and 200 MB resident; the SQLite database can live on a Raspberry Pi just as comfortably as on a Hetzner ARM box. This guide is the timed walkthrough: from a fresh VPS to your first stored credential in under 20 minutes, then the discipline (backups, fail2ban, admin-route hardening) you absolutely owe yourself before tomorrow.
Contents
- Why Vaultwarden over Bitwarden Cloud
- Prerequisites — what you need before you start the clock
- The 20-minute install (docker compose + Caddy)
- First admin sign-in and disable open signups
- Pointing the Bitwarden clients at your server
- Day-2 hardening: fail2ban, backups, admin-route
- Org accounts and family sharing
- FAQ
Why Vaultwarden over Bitwarden Cloud
Three reasons. Cost: Vaultwarden gives you every paid Bitwarden feature (organisations, TOTP, attachments, emergency access) for the price of a VPS. Sovereignty: your encrypted vault never leaves your infrastructure; even an attacker with full Cloudflare logs sees only TLS to your domain. Velocity: Vaultwarden ships features ahead of the official server — Argon2id by default, FIDO2 WebAuthn, push notifications via Bitwarden’s own service. The trade-off is exactly two: you carry the ops burden (updates, backups, TLS), and you accept that the project is volunteer-maintained, so paid premium support is not in the box.
Prerequisites — what you need before you start the clock
- A VPS, the cheapest tier on Hetzner Cloud, OVH, DigitalOcean. 1 vCPU, 1 GB RAM, 20 GB disk. Vaultwarden idles at ~80 MB resident.
- A domain name, with an A record pointing at the VPS. Vaultwarden absolutely requires HTTPS — there is no plain-HTTP fallback in modern Bitwarden clients.
- SSH access to the VPS with a key, not a password.
- 10 minutes for the DNS A record to propagate before you start. Caddy will fail to fetch a Let’s Encrypt cert if your record is still propagating.
The 20-minute install (docker compose + Caddy)
Drop both files in the same directory. The whole stack is two containers and one shared network.
# docker-compose.yml
services:
  vaultwarden:
    image: vaultwarden/server:latest
    restart: unless-stopped
    environment:
      DOMAIN: "https://vault.example.com"
      SIGNUPS_ALLOWED: "true"           # disable after first signup
      ADMIN_TOKEN: "<long-random-string>"
      WEBSOCKET_ENABLED: "true"
      LOG_FILE: "/data/vaultwarden.log"
    volumes:
      - ./data/vaultwarden:/data

  caddy:
    image: caddy:2-alpine
    restart: unless-stopped
    ports:
      - "80:80"
      - "443:443"
    volumes:
      - ./Caddyfile:/etc/caddy/Caddyfile:ro
      - ./data/caddy:/data
      - ./data/caddy_config:/config
# Caddyfile
vault.example.com {
    encode gzip
    reverse_proxy vaultwarden:80
    header {
        Strict-Transport-Security "max-age=31536000;"
        X-Frame-Options "DENY"
        X-Content-Type-Options "nosniff"
        Referrer-Policy "no-referrer"
    }
}
Now bring the stack up:
Caddy fetched the cert from Let’s Encrypt automatically. Open https://vault.example.com in a browser; you should see the Bitwarden Web Vault login screen.
First admin sign-in and disable open signups
Create your account first via the public signup flow, then flip the toggle.
- Hit Create account, enter email, master password ≥ 14 chars (Vaultwarden enforces it for new accounts in 2026).
- Sign in and confirm your vault works — store a throwaway credential.
- SSH back to the VPS, edit
docker-compose.ymlto setSIGNUPS_ALLOWED: "false", thendocker compose up -dto restart. - Browse to
https://vault.example.com/admin, paste theADMIN_TOKENfrom the compose file. You now have the admin dashboard for invites, users, and global config.
SIGNUPS_ALLOWED=true for more than a few minutes, an attacker who guesses the domain can register their own account and start storing data inside your vault server. Disable it as soon as you finish the first signup.Pointing the Bitwarden clients at your server
Every official Bitwarden client supports a custom server URL. The configuration lives behind the login screen: tap the gear icon, choose Self-hosted, enter https://vault.example.com as the Server URL. The mobile apps and the browser extension pick it up immediately.
- Browser extension (Chrome, Firefox, Edge, Safari): Settings → Logged out → gear icon → Server URL.
- iOS / Android: Tap Region on the login screen → Self-hosted.
- Desktop (Win/macOS/Linux): Settings → Server URL.
- CLI (
bw):bw config server https://vault.example.comthenbw login.
Day-2 hardening: fail2ban, backups, admin-route
You owe yourself three things before you stop calling it a side project.
- fail2ban: Vaultwarden writes auth failures to
/data/vaultwarden.log. Configure fail2ban with the official Vaultwarden filter and a 1-hour ban on 3 failed attempts. Drops brute-force attempts from drive-by scanners. - Restic to off-site: nightly snapshot of the
./data/vaultwardenbind mount to a B2 / Backblaze / Hetzner storage box, encrypted with a 32-byte passphrase that lives in your password manager (not the one you are running on this very box). 60 GB B2 bucket = €0.30/month. - Lock the admin route: extend the Caddyfile with a
basic_authchallenge on/admin, or restrict it to your home IP with@admin path /admin*+respond @admin 403from anywhere else. The admin token alone is not enough.
Org accounts and family sharing
The admin dashboard lets you create unlimited Organisations. Each org has its own collections, role-based access (Owner, Admin, Manager, User), and emergency-access policy. The setup for a family of four:
- Admin → Users → Create user for each family member, send the invite link.
- Each user accepts, creates a personal vault on the same server.
- You create an org “Family”, invite the other three, share a collection of household credentials (router admin, Netflix, electricity supplier).
- Personal vaults stay private to each user; only the explicitly shared collection is visible to everyone.
FAQ
Is Vaultwarden as secure as Bitwarden Cloud?
The crypto is identical — Bitwarden’s client-side argon2id + AES-256-GCM design is honoured. Where the security posture differs is operational: Bitwarden Cloud’s team handles patching, DDoS, infrastructure isolation; on Vaultwarden you are that team. Apply OS updates weekly, watch the upstream GitHub for advisories, run fail2ban.
Can I migrate from Bitwarden Cloud to Vaultwarden?
Yes. Export your vault from the Bitwarden web client as an encrypted JSON, point a clean client at your Vaultwarden URL, log in to the new (empty) account, import the JSON. Items, folders, attachments transfer cleanly. Organisation migration is similar but should be done after every user accepts the new invite.
Will browser push notifications work?
Yes, by default. Vaultwarden relays push notifications through Bitwarden’s own infrastructure, so the Bitwarden mobile app gets vault-updated notifications from your self-hosted server without any extra configuration. You can disable this relay by setting PUSH_RELAY_BASE_URI to an empty string if you prefer not to depend on Bitwarden infrastructure.
What about FIDO2 / passkeys?
Supported. The Bitwarden web vault can register passkeys against your domain as a passwordless second factor. The catch is the WEBAUTHN_ORIGIN must match your real domain exactly — same scheme, same host, no port. Add it as an env var in compose if Vaultwarden cannot infer it.
How do I back up the vault?
Stop the container briefly (or use SQLite WAL mode + a copy snapshot), copy the ./data/vaultwarden directory, ship it encrypted to off-site storage. Restic with a Hetzner Storage Box backend is the cheapest reliable pattern — about €1.20/mo for 100 GB.
Can I run this on a Raspberry Pi?
Yes — Vaultwarden has an official ARM64 image. A Pi 4 with 2 GB RAM is plenty. The only operational difference is to use a real SSD (USB or NVMe HAT) — SD cards will burn out under SQLite write activity.
Vault sitting in your cloud? Tunnel into it.
Pair Vaultwarden with self-hosted WireGuard so the admin route is only reachable from inside your VPN — defence in depth.