Building a self-hosted WireGuard VPN is the first VPN setup I actually enjoy running. The whole thing is under 4 000 lines of kernel code, it speaks ChaCha20-Poly1305 over UDP, and the tunnel comes up in a single round trip from a config file you can read in one screen. Here is how I build it: server on a 5 EUR VPS, clients on Linux, macOS, Windows, iOS and Android. Most of the words below go to the two decisions that come back to bite you, split-tunnel vs full-tunnel, and keeping a laptop or phone behind home NAT from quietly dropping the tunnel. The firewall, sysctl and DNS bits get a look too, because those separate works on my laptop from a tunnel still up six weeks later.
The short answer
A self-hosted WireGuard VPN runs on any 5 EUR VPS with one decision up front:
split-tunnel (AllowedIPs = 10.0.0.0/24) sends only your home LAN, full-tunnel
(AllowedIPs = 0.0.0.0/0, ::/0) sends everything. Generate one Curve25519 key
pair per peer, write wg0.conf, turn on IP forwarding and MASQUERADE, and the
tunnel is up.

I've set up a lot of VPNs. WireGuard is the first one I actually enjoy running, and honestly I didn't expect to feel that way about a VPN. The whole thing is under 4 000 lines of kernel code. It speaks ChaCha20-Poly1305 over UDP, and the tunnel comes up in a single round trip from a config file you can read in one screen. So here's how I build the self-hosted version: server on a 5 EUR VPS, clients on Linux, macOS, Windows, iOS and Android. Most of the words below go to the two decisions that come back to bite you, split-tunnel vs full-tunnel, and to keeping a laptop or phone behind home NAT from quietly dropping the tunnel. The crypto underneath gets a look too. So do the firewall, sysctl and DNS bits, because those are what separate "works on my laptop" from a tunnel that's still up six weeks later.
Why WireGuard, not OpenVPN or IPsec, in 2026
I keep a few reasons in my head, roughly in the order you'll feel them. First, code size. WireGuard is around 4 000 lines. OpenVPN is closer to 600 000, and strongSwan / IPsec sits around 400 000. Less code means less to attack and fewer CVEs. It also means an audit a human can actually finish in one sitting. Second, throughput. The data path lives in the kernel and uses ChaCha20-Poly1305, which is cheaper than AES on any CPU without AES-NI, so on a cheap VPS I routinely see 2-4x what OpenVPN gives me on the same box. Then there's the one I didn't appreciate until I'd lived with it for a while: roaming. WireGuard keys a peer to its public key, not its IP, so when my phone jumps from Wi-Fi to LTE the tunnel just keeps going. OpenVPN drops the session. IPsec stutters. WireGuard doesn't even blink.
What you give up is flexibility. No username and password. No certificates, no PKI. You hand out public keys the same way you hand out SSH keys, over some channel you already trust. For a homelab or a small team I treat that as a win, one less moving part to break. Now, if you're wiring up five thousand seats, that same minimalism is exactly why you'd put Tailscale or Cloudflare WARP on top of WireGuard instead of hand-editing raw configs until you go cross-eyed.
Pick your topology: split vs full-tunnel
Settle this first, before you type a single line. The client config bends around the answer, and changing your mind later means rewriting the thing.
| Question | Split-tunnel | Full-tunnel |
|---|---|---|
| What do you tunnel? | Only the destinations you list (home LAN, internal SaaS, jump host) | Everything, including Netflix and your bank |
AllowedIPs value | 10.0.0.0/24 (or your private range) | 0.0.0.0/0, ::/0 |
| Bandwidth | Full ISP throughput | Capped at VPS uplink |
| DNS leak risk | Local resolver, leaks possible | VPN resolver, by-design private |
| Geo unblocking | No | Yes |
| Best for | Remote access to home / office | Untrusted Wi-Fi, hostile networks |
You don't have to pick once and forever, either. I keep two profiles on my laptop and flip between them depending on where I'm sitting that day. Want it finer than that? The macOS and iOS apps can route per app, so only the work tools go through the tunnel.
Step 1: server install (Debian / Ubuntu VPS)
Grab any 5 EUR VPS with a clean public IPv4. I've run this on Hetzner, OVH, DigitalOcean, Vultr, and they're all fine. The box barely sweats. Debian 12 or Ubuntu 24.04 LTS, one vCPU, 1 GB of RAM, and that's plenty. Update it, install WireGuard, then lock down the config directory before anything else has a chance to land in it.
sudo apt update
sudo apt install -y wireguard wireguard-tools qrencode iptables-persistent
sudo install -d -m 0700 /etc/wireguard
cd /etc/wireguard
One thing that throws people coming from OpenVPN: there's no daemon here. None. WireGuard is baked into any kernel >= 5.6, so the only thing you "start" is wg-quick, the systemd unit that reads your config file and brings the interface up. That's the whole service, believe it or not.
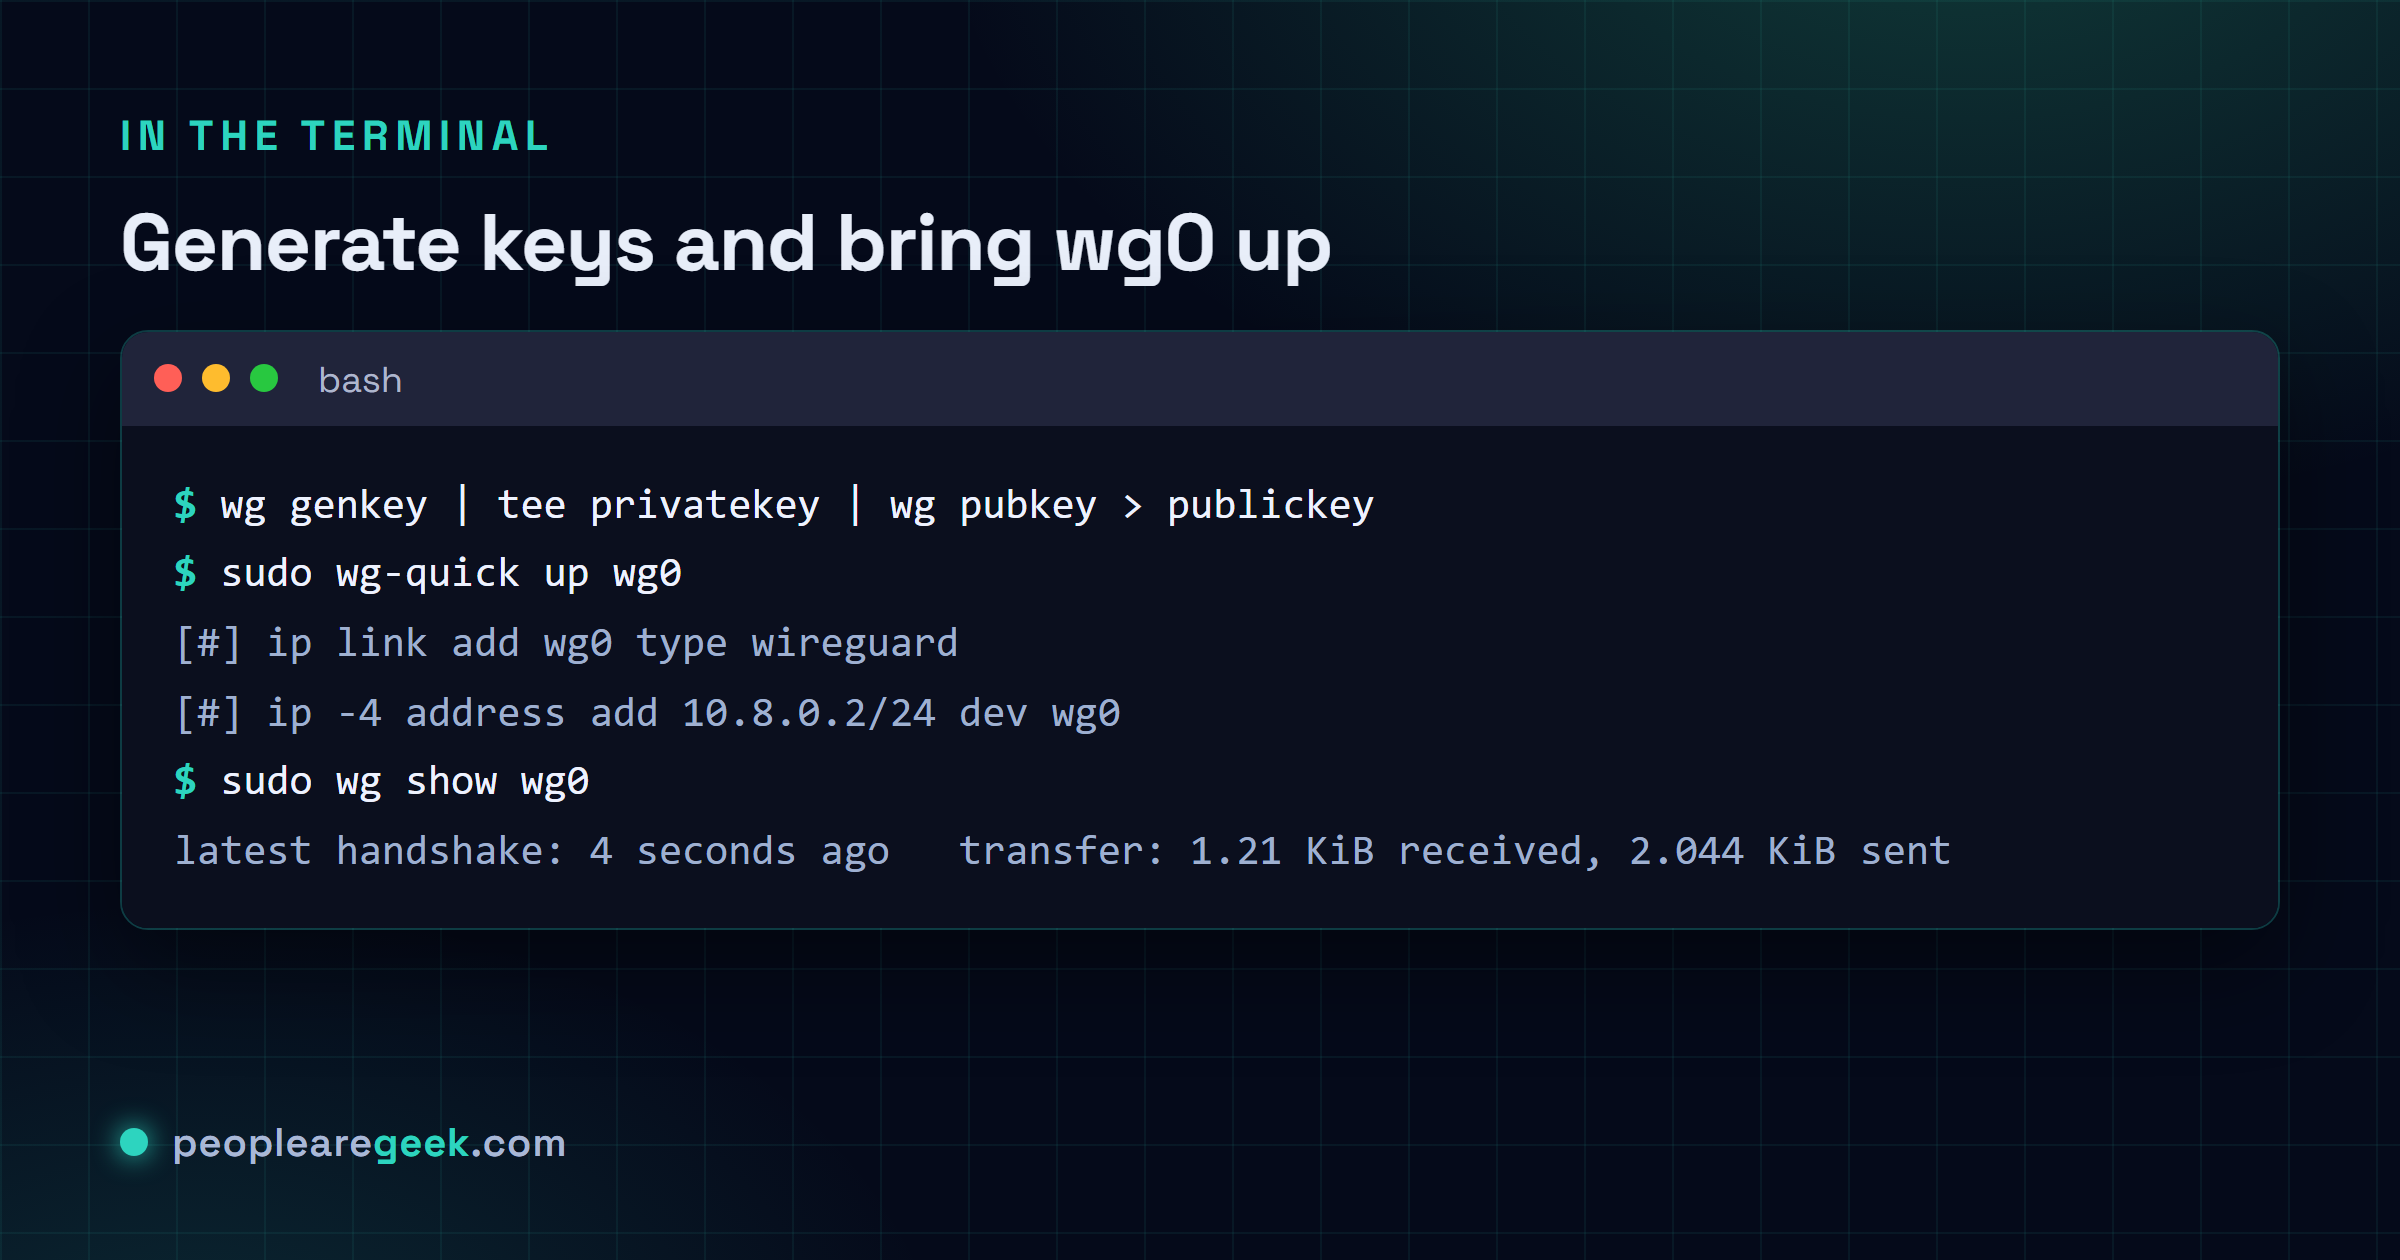
Step 2: generate keys and write the config
One key pair per peer. Never share one across two clients (more on why that hurts later). wg spits out Curve25519 pairs.
# on the server
umask 077
wg genkey | tee server.key | wg pubkey > server.pub
wg genkey | tee client1.key | wg pubkey > client1.pub

# inspect (private keys never leave the machine they were generated on)
ls -l /etc/wireguard/
cat server.pub client1.pub
Now write the server config at /etc/wireguard/wg0.conf. The [Interface] block holds the server's own private key and its address on the tunnel. Then you get one [Peer] block per client, and each one pairs that client's public key with the tunnel IPs it's allowed to use. Here's the part people miss: that AllowedIPs line does double duty. It's routing and an access-control list at the same time. Be precise with it.
[Interface]
PrivateKey = <contents of server.key>
Address    = 10.8.0.1/24
ListenPort = 51820
SaveConfig = false
PostUp     = iptables -A FORWARD -i wg0 -j ACCEPT; iptables -t nat -A POSTROUTING -o eth0 -j MASQUERADE
PostDown   = iptables -D FORWARD -i wg0 -j ACCEPT; iptables -t nat -D POSTROUTING -o eth0 -j MASQUERADE

[Peer]
# laptop
PublicKey  = <contents of client1.pub>
AllowedIPs = 10.8.0.2/32
Turn on IP forwarding next. The server is routing for its clients now, so skip this and the tunnel comes up and then goes precisely nowhere. Then bring the interface up.
sudo sysctl -w net.ipv4.ip_forward=1
echo 'net.ipv4.ip_forward = 1' | sudo tee /etc/sysctl.d/99-wg.conf
sudo systemctl enable --now wg-quick@wg0
sudo wg show wg0
Step 3: client config on Linux, macOS, Windows, mobile
Good news. The client is a single file, and it looks the same whether you're on Linux, a Mac, a phone, doesn't matter. What you see below is the split-tunnel flavour. It only pushes the home LAN through WireGuard and leaves the rest of your traffic alone. Want the full-tunnel version instead? Swap AllowedIPs for 0.0.0.0/0, ::/0. That's it.
[Interface]
PrivateKey = <contents of client1.key>
Address    = 10.8.0.2/24
DNS        = 1.1.1.1, 9.9.9.9
# DNS        = 10.0.0.1   # use the LAN resolver instead, on split-tunnel

[Peer]
PublicKey           = <contents of server.pub>
Endpoint            = vps.example.com:51820
AllowedIPs          = 10.0.0.0/24, 10.8.0.0/24
PersistentKeepalive = 25
That PersistentKeepalive = 25 line earns its keep. It fires a tiny 32-byte UDP packet every 25 seconds, just often enough to stop a home router from forgetting the NAT mapping and silently killing your tunnel. On a wired desktop with a real public IP? Drop it, it's just noise there. On anything that roams, a laptop or a phone, leave it in. Every single time.
Per platform, here's how it shakes out:
- Linux: drop the file at
/etc/wireguard/wg0.conf, thensudo wg-quick up wg0and you're connected. Want it to survive reboots?systemctl enable --now wg-quick@wg0. - macOS: grab the WireGuard app from the App Store and pull the file in with "Add Tunnel from File...". The key goes into the system keychain, so you're not leaving it lying around as plaintext for anyone to find.
- Windows: run the WireGuard.exe installer from
wireguard.com, hit "Add Tunnel", paste the config. The TunSafe-based driver rides along, so there's nothing else to install. - iOS / Android: this is the slick one. On the server, run
qrencode -t ansiutf8 < client1.conf, point the WireGuard app's camera at the block of squares, and the whole config just lands on the phone. No thumb-typing a 44-character key like an animal.

Step 4: firewall, NAT and DNS
Three things have to agree with each other here. When the tunnel "works but has no internet", it's almost always one of them out of step: kernel IP forwarding, the iptables / nftables NAT, your DNS. The server config up top already handles NAT with that POSTROUTING -j MASQUERADE rule. Beyond that, two more rules are worth your time:
- Throw away forwarded packets that didn't actually come from inside the tunnel:
iptables -A FORWARD -i wg0 ! -s 10.8.0.0/24 -j DROP. That's what stops a sloppily configured client from claiming another peer's address and riding through your server like it owns the place. - Tighten the exposure at the cloud provider's own firewall, not just on the box. Let UDP 51820 in from anywhere, but pin SSH on TCP 22 (or whatever port you moved it to) down to the IP ranges you actually manage from. No reason to wave your SSH port at the whole internet.
DNS is where the embarrassing leaks happen. If you're full-tunnelling, set DNS = 1.1.1.1 in the client's interface block. Otherwise the OS cheerfully keeps asking the coffee-shop Wi-Fi resolver what you're looking up, which, you know, rather defeats the point of the tunnel. On split-tunnel you want the opposite: aim DNS at your home resolver (10.0.0.1 or wherever yours lives) so your internal hostnames still resolve.
Under the hood: the WireGuard handshake
You don't have to know any of this to run WireGuard. But it's genuinely elegant, and it explains a lot of the behaviour you'll see. The entire handshake is two UDP messages, done in a single round trip. From there both sides share a symmetric key, and every packet after that gets wrapped in a 16-byte authenticated ChaCha20-Poly1305 envelope.
The 1-RTT handshake works out a fresh symmetric key with the Noise IK pattern over Curve25519. Then the data plane runs ChaCha20-Poly1305 with a per-packet counter, so nobody can replay your traffic, and the kernel's cryptokey-routing table is what figures out which peer a given packet belongs to. Keys roll over every 120 s or 2^30 messages, whichever lands first. So even a captured session key has a short shelf life.
A few nice things just fall out of that design for free. A peer is its public key, not a DNS name, not an IP, so identity never drifts. The server also stays dead quiet to strangers. Scan its port from the wrong key and you get nothing back, which means a port scan can't even confirm there's a WireGuard endpoint sitting there at all. Maybe it's just me, but I find that one genuinely reassuring on a public VPS, more than the throughput numbers honestly. And because all the crypto runs in the kernel, a single core will happily fill a gigabit link.
Hardening and operations
- Keep the listener on the public interface only. If your VPS has a second, private NIC for internal traffic, don't let
ListenPortanswer on it. Fence it off with firewall rules so the tunnel only lives where you expect it to. - Watch the handshake counters.
wg showhands you last-handshake time, transfer totals, the configured peers, all at once. I cron it every minute and alert when any peer's last handshake slips past 300 seconds. That's usually your first sign something's wrong, well before a user thinks to complain. - Rotate keys once a year. Curve25519 isn't going to wear out. Your habits are the thing that rots. A yearly reissue keeps the muscle memory alive. Cut every client over on the same day and make the old keys fail closed.
- Harden the host underneath. The tunnel is only as safe as the box it runs on, so run through our Linux kernel hardening checklist. Pay attention to the network section, and to dropping
kernel.modules_disabled = 1in once you've finished booting. - Back up the keys. Nothing else matters.
/etc/wireguard/*.keyand their matching.conffiles are the VPN. Encrypt that handful of files and stash them off-site somewhere. If the VPS evaporates tomorrow, everything else is a five-minute reinstall.
Common pitfalls
- Tunnel keeps dying after about 25 seconds. Nine times out of ten there's no
PersistentKeepaliveon the client. The tenth time? A paranoid router that drops idle UDP after 15. So if the keepalive's already there, just lower it to 15 and move on. - Tunnel's up but there's no Internet. The classic. Either the server never got
net.ipv4.ip_forward = 1, or the MASQUERADE rule didn't survive a reboot becauseiptables-persistentwasn't actually enabled. Check it straight away withiptables -t nat -L POSTROUTING. - DNS leaking on full-tunnel. Plenty of distros quietly keep talking to the
systemd-resolvedstub at127.0.0.53no matter what you told them. Fix it by settingDNS = 1.1.1.1in the client config sowg-quickrewritesresolv.conffor you. Or just turn the stub off. - IPv6 sneaking out the side door. Set
AllowedIPs = 0.0.0.0/0, forget its::/0partner, and your v6 traffic strolls straight out unencrypted while you sit there thinking you're fully tunnelled. Always write the pair. - The VPS public IP changes on you. WireGuard genuinely doesn't care. Your client's
Endpointdoes, though, if you hard-coded the IP. Put a DDNS hostname in there instead and the problem just disappears. - Reusing one private key on two clients. Don't. The handshake picks whichever client reached the server first and leaves the other one staring at timeouts it can't explain. One keypair per peer, no shortcuts. This is the trap I watch people fall into more than any other.
Can I use one config file for both split and full-tunnel?
No. Each profile is one mode, and the app won't let you straddle both in a single file. The tidy way is to keep two files, wg-split.conf and wg-full.conf, plus a little script that swaps whichever one is live. On a phone it's even easier. Add both as separate tunnels in the WireGuard app and just tap to flip between them.
Frequently asked questions
How is WireGuard different from Tailscale?
Same engine, different car. Tailscale runs WireGuard underneath and bolts on the stuff WireGuard deliberately leaves out: a coordination service, SSO identity, ACLs, NAT traversal through DERP relays, a web admin panel. Got a fleet of machines that need to find each other with basically zero config? That is Tailscale's whole reason to exist. But for one server you own and a handful of clients you set up by hand, I would reach for raw WireGuard every time. It is simpler, and there is no third party in the loop who can have a bad day on your behalf.
Can I run WireGuard on a Raspberry Pi as the server?
Yes, and honestly it is a great little box for it. A Pi 4 will fill its gigabit NIC with WireGuard traffic without complaint. The thing to watch is not performance, it is the front door. You are punching UDP 51820 from the open Internet straight into your home network. So forward only that one port, nothing else, and put the firewall rules from the guide in place so a misconfigured peer cannot start spoofing addresses all over your LAN.
Is WireGuard secure against quantum computers?
Not on its own, no. Curve25519 is not post-quantum, so the honest answer is that a future quantum computer big enough to matter could go back and crack sessions someone recorded today. The harvest now, decrypt later problem, people call it. The maintainers have published a post-quantum extension, and folks like Mullvad and Cloudflare are already layering hybrid PQ key exchange on top of WireGuard. For the threats most of us are actually defending against in 2026, plain WireGuard is fine, I think. Guarding secrets that need to stay secret for twenty years? That is when I would look harder at the hybrid options.
How many peers can a single server handle?
Several hundred without the server even noticing. What you run out of first is not peer slots, it is CPU for ChaCha20-Poly1305, and one core will chew through about 1 Gbps of combined peer traffic before that is a worry. Push past a thousand active peers, though, and the pain stops being throughput. It becomes wrangling a giant config file by hand. That is the point where I would switch to a coordination layer like Tailscale or Netbird and stop fighting it.
Does WireGuard work behind carrier-grade NAT (CGNAT)?
From the client side, yes. The client opens the UDP session outbound, so CGNAT does not get in its way. The catch is the server. It has to be reachable, which means a real routable public IP. Where this falls apart is when both ends sit behind CGNAT and neither can be dialled directly. Then you are looking at a relay in the middle (DERP, ZeroTier, the FRP project) or a coordination service like Tailscale that punches through for you.