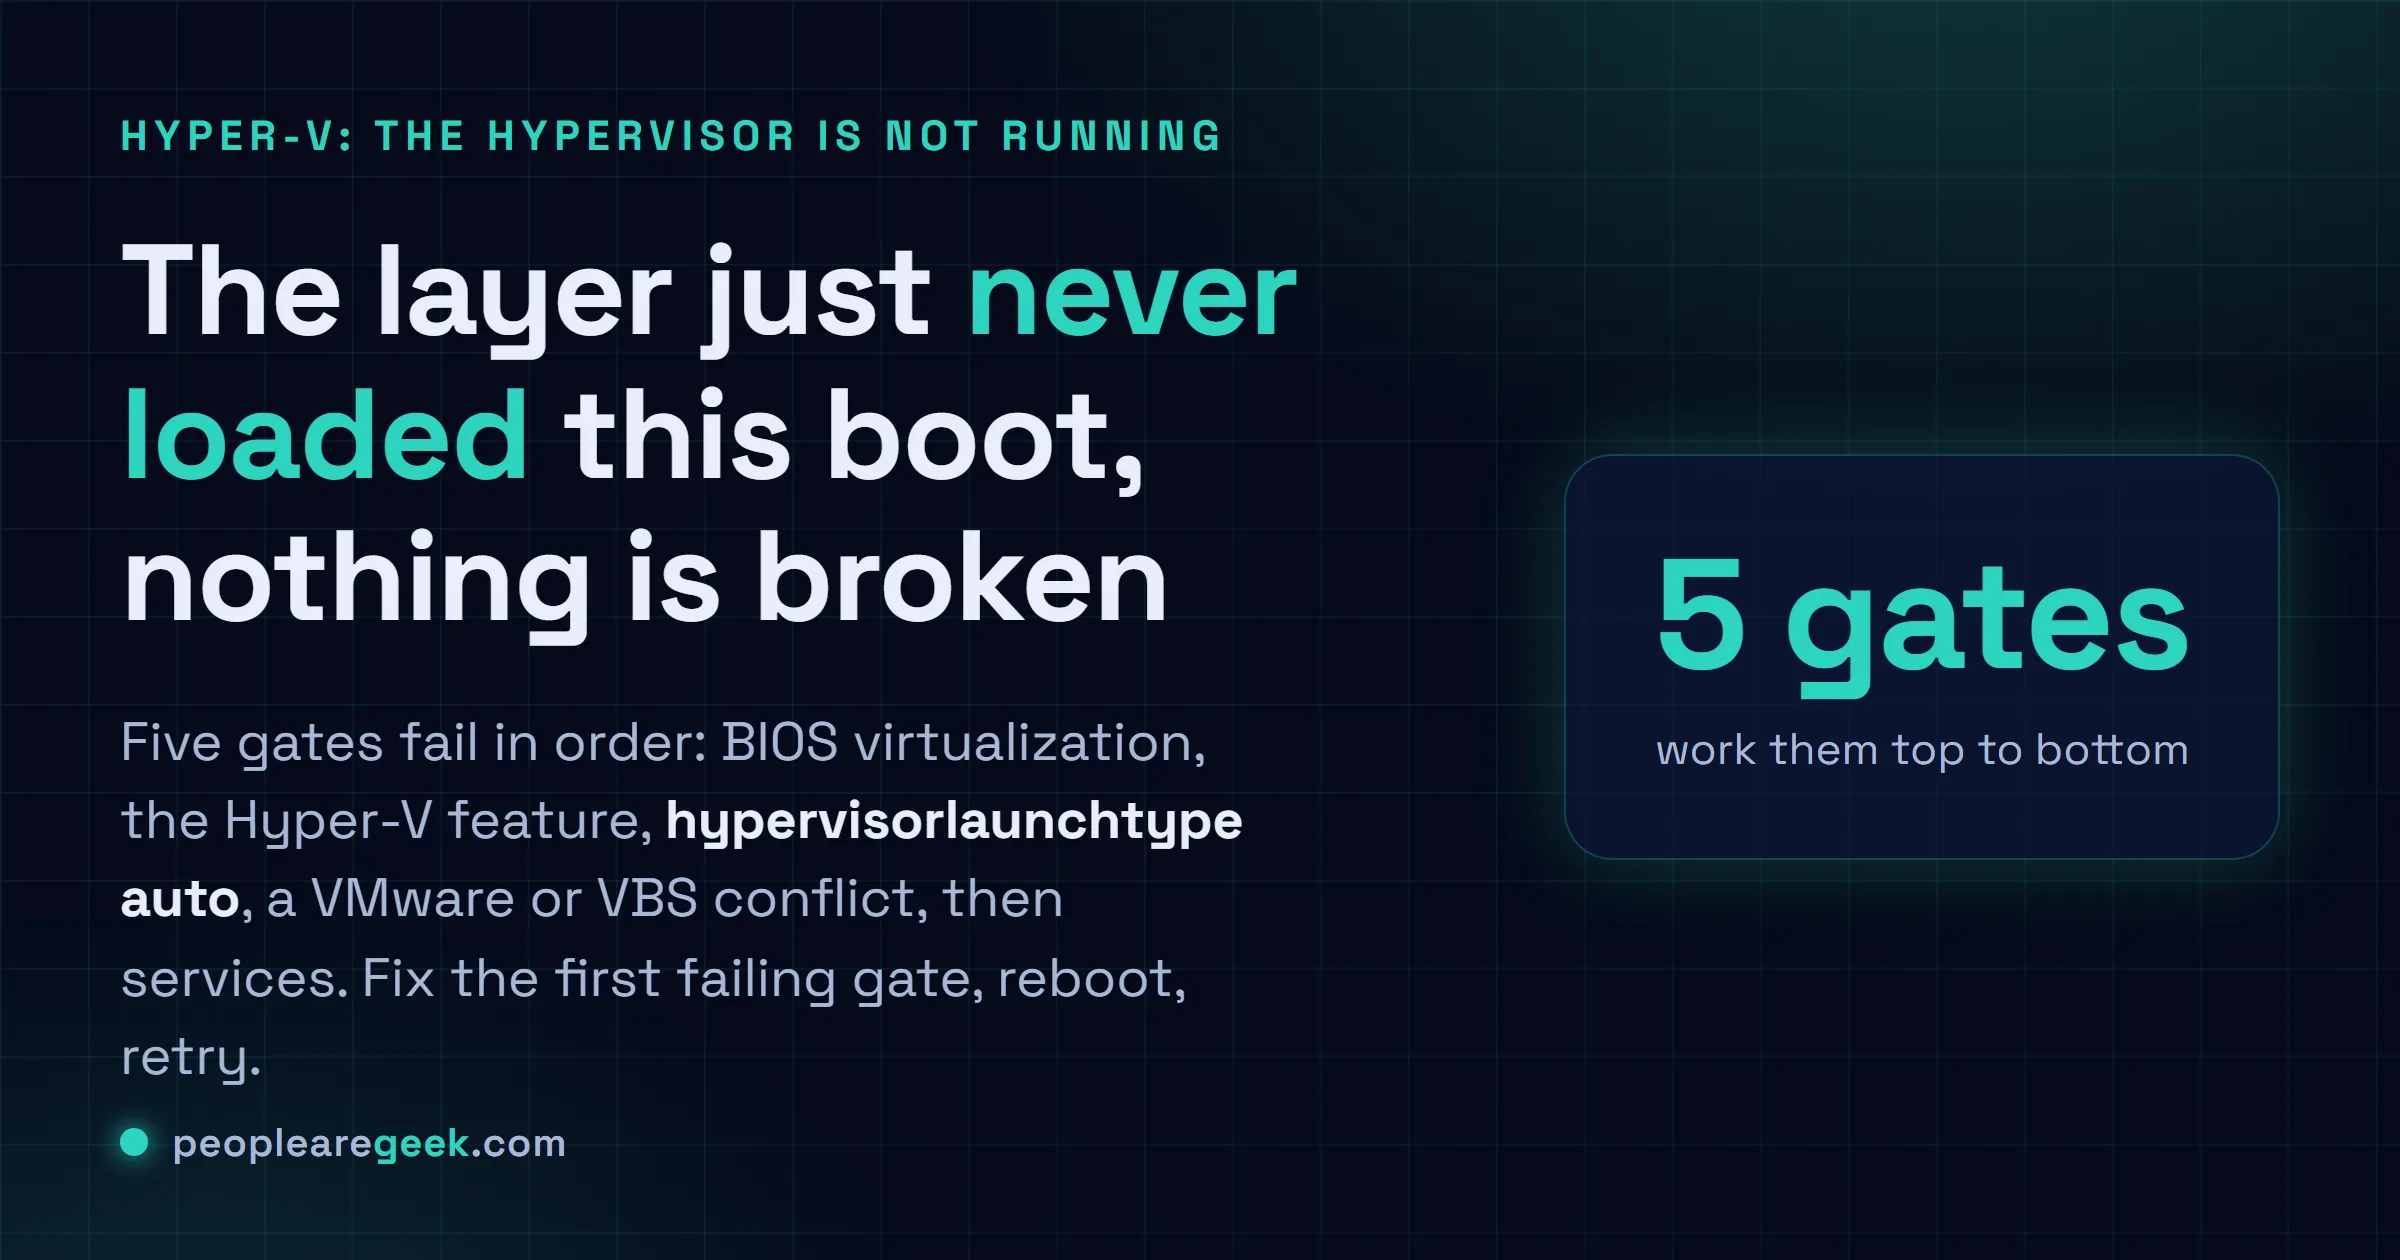
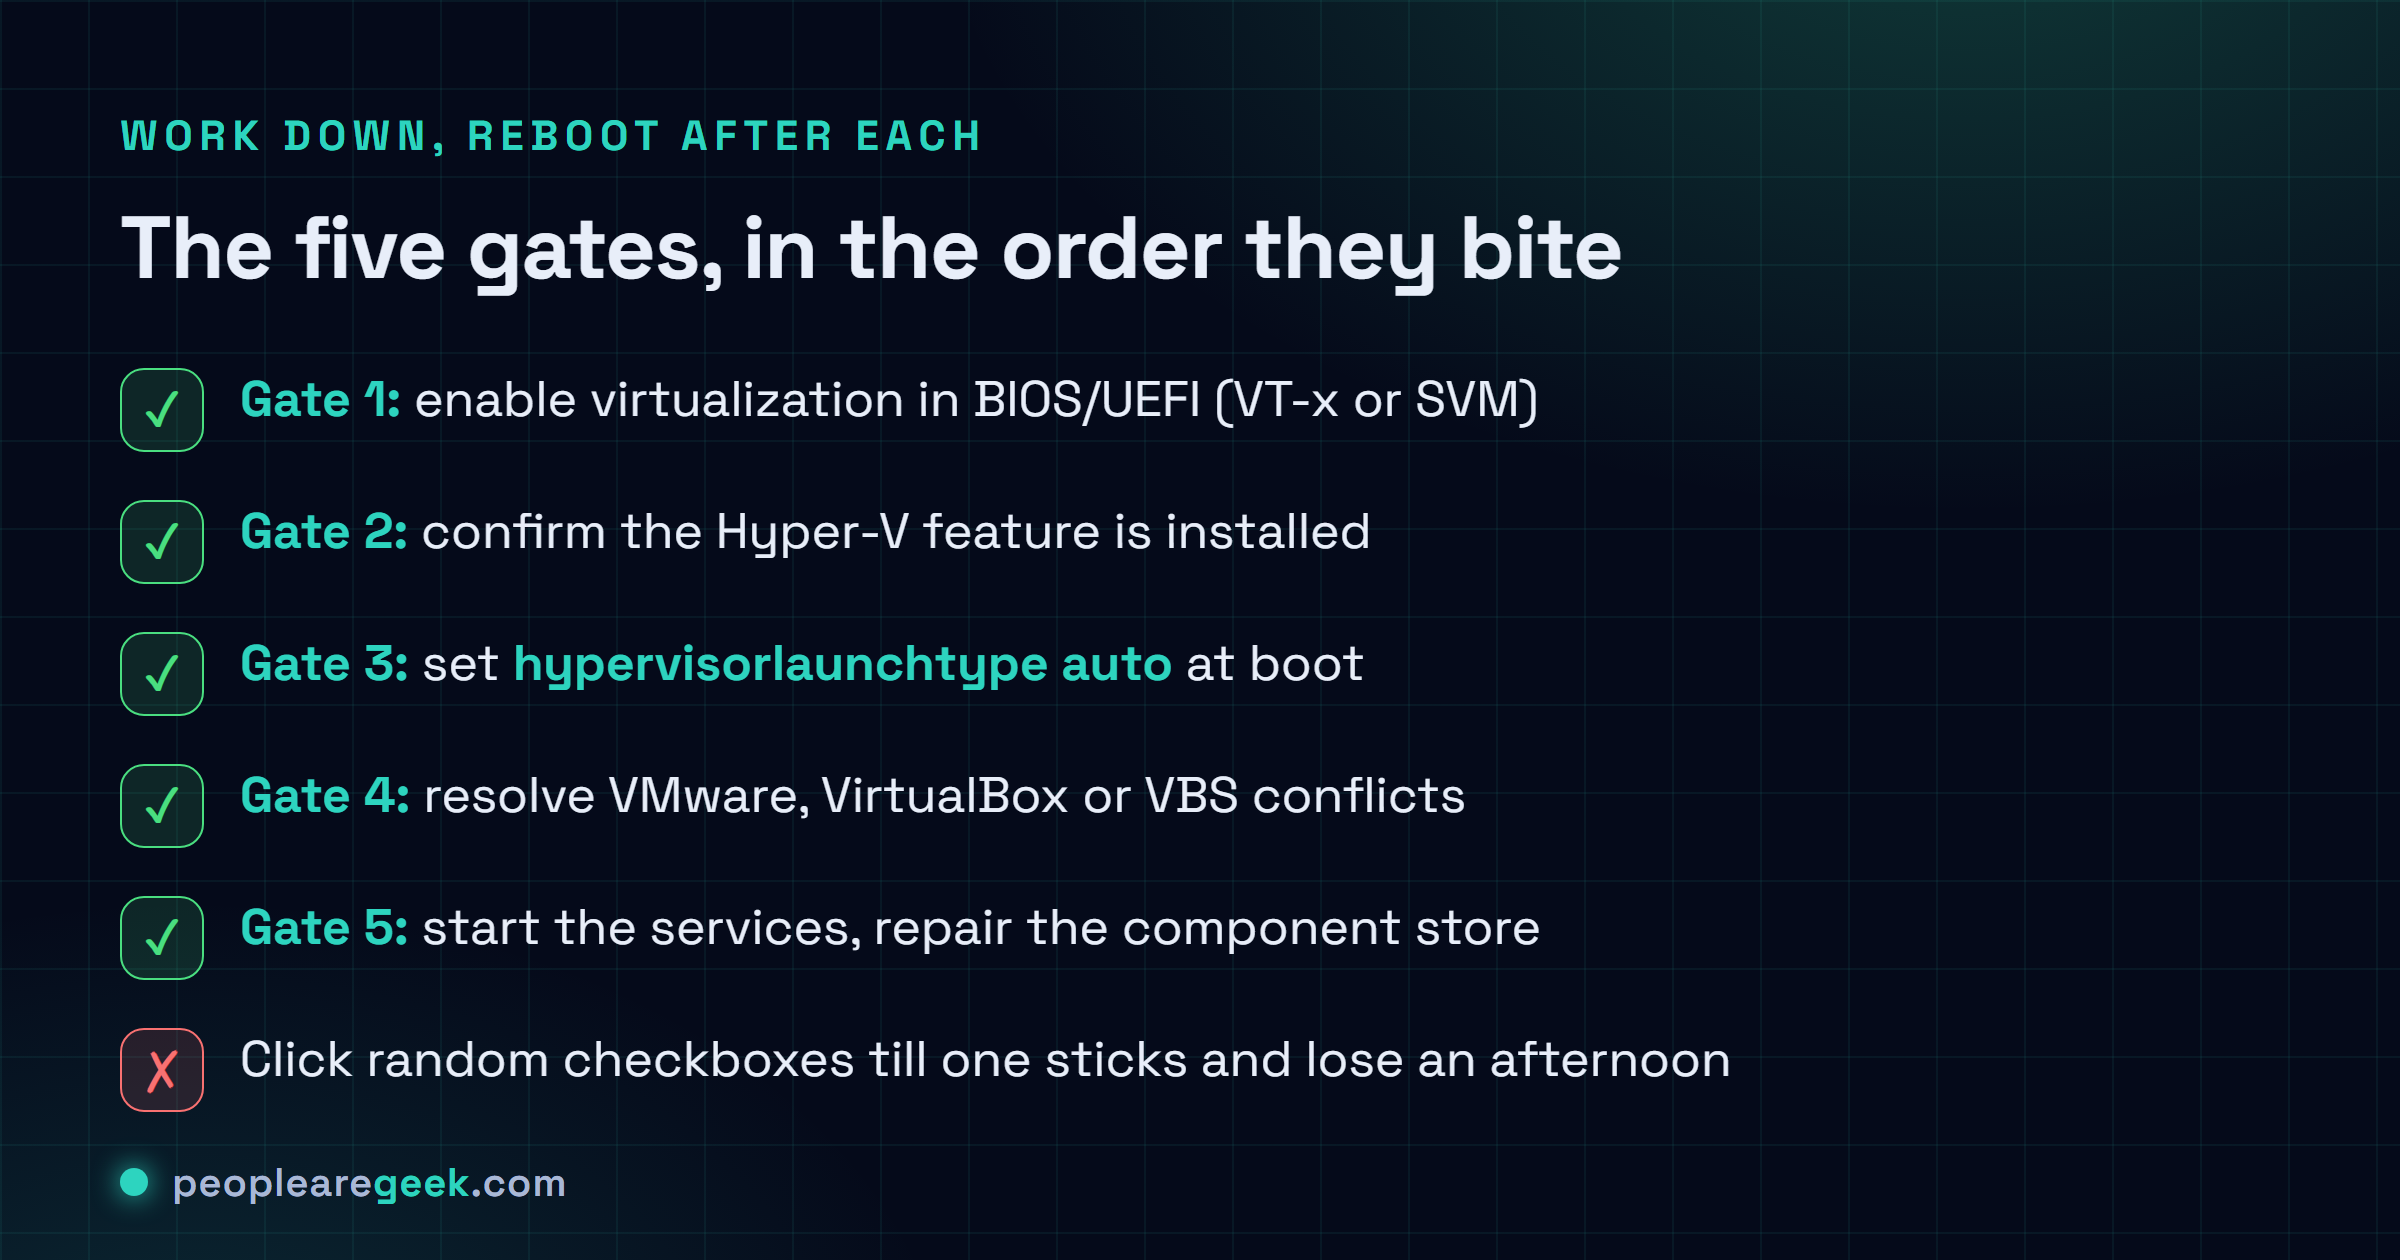
When Hyper-V says the hypervisor is not running, the layer simply never woke up this boot, and nothing is actually broken. I have babysat Hyper-V on lab boxes and dev laptops for years, and this thing fails for maybe five reasons, no more, and they tend to break in a pretty predictable order. So I just work them top to bottom. Fix the first gate that is failing, reboot, try again. That beats clicking random checkboxes till one of them sticks, which is how most folks lose an afternoon to this. BIOS virtualization, the Hyper-V feature, the boot flag, a rival hypervisor or VBS, then services.
The short answer
"The hypervisor is not running" almost always means the Type-1 layer never loaded at
boot, not that anything is broken. Work the five gates in order: enable virtualization
in BIOS (VT-x/SVM), confirm the Hyper-V feature is installed, set
hypervisorlaunchtype auto, clear a VMware/VirtualBox/VBS conflict, then start the
services. Fix the first failing gate, reboot, retry.
You hit Start on a VM and Hyper-V slams the door: "The virtual machine could not be started because the hypervisor is not running" or the older phrasing "Virtual machine could not be started because the hypervisor is not running". And half the time Task Manager's sitting right there showing Virtualization: Disabled, just to twist the knife. Looks like Windows ate itself. It didn't. I've babysat Hyper-V on lab boxes and dev laptops for years now, and honestly? This thing fails for maybe five reasons, no more, and they tend to break in a pretty predictable order. So I just work them top to bottom. Fix the first gate that's failing, reboot, try again. Beats clicking random checkboxes till one of them sticks, which is how most folks lose an afternoon to this.

What the error actually means
Here's the bit that makes the error click. Hyper-V is a Type-1 hypervisor. Which is a fancy way of saying it isn't a program Windows runs, it's a thin layer that loads before Windows does, way down at boot, straight onto the CPU's virtualization extensions. So when Windows says "the hypervisor is not running," what it actually means is that layer never woke up this boot. And the reasons are short. The CPU extensions are switched off. Or nobody told Windows to launch the hypervisor at boot. Or something else grabbed those extensions first, a rival hypervisor, say, or Virtualization-Based Security wedged in a bad state. Notice what's not on that list? Corruption. Most of the time nothing's actually broken. The layer just didn't load, and your VM can't run on nothing.
Gate 1: enable virtualization in BIOS/UEFI
Start here. Always. This is the one I run into most, and it has a real soft spot for brand-new machines and any box that's had its CMOS cleared. Reboot into firmware setup (mash Del, F2, F10 or F1 as it powers on, the key's a vendor lottery) and flip the virtualization extension on. What it's called depends on whose silicon you've got:
- Intel: turn on Intel Virtualization Technology (VT-x). And VT-d as well, if your firmware can be bothered to list it.
- AMD: you want SVM Mode (Secure Virtual Machine). It's usually buried a menu or two deeper than feels reasonable.
Now the bit everyone skips: save, then do a full shutdown, not a restart. Plenty of firmware only commits the change on a cold boot. So a quick reboot leaves you glaring at the exact same error, swearing the toggle did nothing. Back in Windows, prove it took:
PS> Get-ComputerInfo -Property "HyperV*"
HyperVRequirementVirtualizationFirmwareEnabled : True
HyperVRequirementVMMonitorModeExtensions : True
Not a PowerShell person? Open Task Manager → Performance → CPU and look at the bottom panel for Virtualization: Enabled. Same answer, a lot fewer keystrokes.
Gate 2: confirm the Hyper-V feature is installed
VT-x is on and you're still stuck? Then I'd start suspecting the role itself. Maybe it never finished installing. Maybe some half-finished install left it sort of half-there, in that weird in-between state. Either way the hypervisor won't load. I just reinstall it clean from an elevated PowerShell and let Windows untangle itself:
Enable-WindowsOptionalFeature -Online -FeatureName Microsoft-Hyper-V -All
# reboot when prompted, then verify:
Get-WindowsOptionalFeature -Online -FeatureName Microsoft-Hyper-V-Hypervisor
State wants to read Enabled. Now here's the gotcha that snags people week after week: on Windows 11/10 Home, the Hyper-V role isn't disabled, it just doesn't ship. At all. You can click till your wrist hurts and it won't appear. Pro, Education or Enterprise, that's the price of entry. Although, if all you really want is WSL2 or Docker, you don't actually need the whole role, enable VirtualMachinePlatform instead. That gets you the hypervisor without dragging in the full Hyper-V management stack, and it runs fine on Home.
Gate 3: set the hypervisor to launch at boot
This one's my favourite, and I think it's because the fix is a single line while the cause is so wonderfully petty. The feature can be installed perfectly and the hypervisor still won't launch, because a separate boot-configuration flag gets the final say. And all kinds of things flip that flag off behind your back. A game's anti-cheat that wants the extensions for itself. An older VMware. Half the "fix your VM" guides floating around out there. They switch it off, do whatever they came to do, and never bother flipping it back. Go look:
bcdedit /enum {current}
# look for: hypervisorlaunchtype   Auto
# if it says Off, turn it back on:
bcdedit /set hypervisorlaunchtype auto
Reboot. Boot flags only get read at boot, so nothing happens until you do. And honestly, if everything else looks clean and the error's still there, I'd put my money on this line. It's quietly behind a huge chunk of the "hypervisor is not running" cases I've seen, maybe more than any other single cause.
Heads up. If bcdedit throws back "The integer data is not valid" or just flat refuses you, it almost always means one thing: you're not in an elevated prompt. Close it. Relaunch PowerShell or Command Prompt as Administrator, run the same command, and it'll take.
Gate 4: resolve VMware / VirtualBox / VBS conflicts
At the hardware level, only one thing gets to own the CPU virtualization extensions. One. So if something else has already grabbed them, Hyper-V is locked out cold, and you'll get the error no matter how spotless gates 1 through 3 look. The usual culprits I go hunting for:
- VMware Workstation 15 or older just won't share the CPU with Hyper-V. It's an architectural standoff, not a checkbox you can talk it out of. Upgrade to Workstation 16+, which speaks the Windows Hypervisor Platform and coexists happily, or accept that you'll have to disable Hyper-V to keep the ancient VMware around.
- VirtualBox below v6 pulls the exact same stunt. Update it and the whole problem evaporates, because modern VirtualBox rides the Hyper-V backend instead of brawling with it.
- Virtualization-Based Security (VBS), which is Core Isolation, Memory Integrity, Credential Guard and that crowd, leans on the hypervisor too. Most of the time they coexist without a fuss. But a VBS that's only half-enabled, or wedged by some group policy somewhere, will quietly murder your VMs. This is the one that takes the longest to even suspect. If you don't need it, turn off Core Isolation → Memory Integrity in Windows Security, reboot, and try again.
Before you start switching things off, know what you're trading away. WSL2, Docker Desktop, the Windows Sandbox, Hyper-V, they all drink from the same well. They all need that hypervisor. Kill it to keep some old VMware happy and you've just taken those down with it, usually weeks later, long after you've forgotten this is why your containers stopped working. So I'll say what I say to everyone, drag the conflicting software into this decade instead of crippling Hyper-V. That's the route I'd take, anyway.
Gate 5: services and system-file repair
You almost never get here. But when all four earlier gates pass and a VM still won't start, it's usually one of two things: stopped management services, or a component store that's taken some damage. Get the services up and patch the image:
Start-Service vmcompute
Start-Service vmms
Set-Service vmms -StartupType Automatic

# repair Windows component store if services refuse to start
DISM /Online /Cleanup-Image /RestoreHealth
sfc /scannow
And if even that won't shift it, here's the nuclear option: rip the role out and put it back. Run Disable-WindowsOptionalFeature -Online -FeatureName Microsoft-Hyper-V-All, reboot, then enable it again. That rebuilds the WMI namespace and the hypervisor boot entry from scratch, which tends to flush out whatever mess the earlier steps couldn't reach. I've personally never had to go further than this.
Verify the fix
One habit that's saved me a lot of grief. After any change and the reboot that follows, confirm the hypervisor actually loaded before you start cursing Hyper-V all over again. One line settles it:
PS> Get-CimInstance Win32_ComputerSystem | Select HypervisorPresent
HypervisorPresent
-----------------
True

PS> Get-VM | Start-VM   # your VMs now start
HypervisorPresent comes back True? Then the layer's up and that original error is dead. If it's still False after you've worked through all five gates, don't spiral, just go back to the BIOS and look again. A firmware update will happily reset that virtualization toggle without a peep, so the thing you fixed on Tuesday can be quietly off again by Friday.
Sources and further reading
Frequently asked questions
Why did Hyper-V suddenly stop working after a Windows update?
Because the update poked something it had no business poking. A feature update can quietly reset the hypervisorlaunchtype flag, or flip a VBS feature back on that now picks a fight with your VMs. Run bcdedit /set hypervisorlaunchtype auto, reboot, and peek at Core Isolation while you're in there. And don't write off firmware. Updates that ride in through Windows Update can knock the BIOS virtualization toggle right back off, so if the flag looks fine, check there next.
Task Manager shows "Virtualization: Enabled" but I still get the error. Why?
Because that line answers a narrower question than you'd guess. All it's telling you is that the CPU extensions are switched on. That's Gate 1, and only Gate 1. The hypervisor can still be turned off at boot (Gate 3), or shoved aside by a conflict (Gate 4), and Task Manager won't say a word about either one. So check bcdedit for hypervisorlaunchtype Auto, then confirm HypervisorPresent is True with the PowerShell command further up.
Can I run Hyper-V and VMware Workstation together?
On Workstation 16 and up, yes, and it's genuinely painless, those builds ride the Windows Hypervisor Platform API and share nicely with Hyper-V. On 15 or older, no, and there's no clever trick around it. You'd have to disable Hyper-V and VBS to hand the CPU extensions over to the old VMware, and the second you do that you've also knocked out WSL2 and Docker Desktop. My advice? Just upgrade VMware and skip the whole tug-of-war.
Does disabling Memory Integrity make my PC less secure?
A little, yeah, and I won't pretend otherwise. Memory Integrity (HVCI) walls off kernel memory from a whole class of nasty driver-based attacks. On a throwaway lab box, or a dev machine you don't care much about, switching it off is a fine trade and I do it without losing any sleep. But on your daily driver, the one with real data on it? I'd honestly rather hunt down what's actually conflicting, upgrade that creaky old VMware, and leave Memory Integrity right where it's earning its keep.
What is the difference between this error and "virtualization support is disabled in the firmware"?
Think of it as specific versus vague. The firmware message points right at Gate 1: your CPU extensions are off in the BIOS, end of story. "The hypervisor is not running" is the shrug of the two. Could be Gate 1, sure. Could just as easily be the boot flag, or the feature state, or a conflict somewhere. So when Windows hands you the firmware-specific wording, count yourself a bit lucky and head straight to the BIOS step, because it's basically told you where to look.