


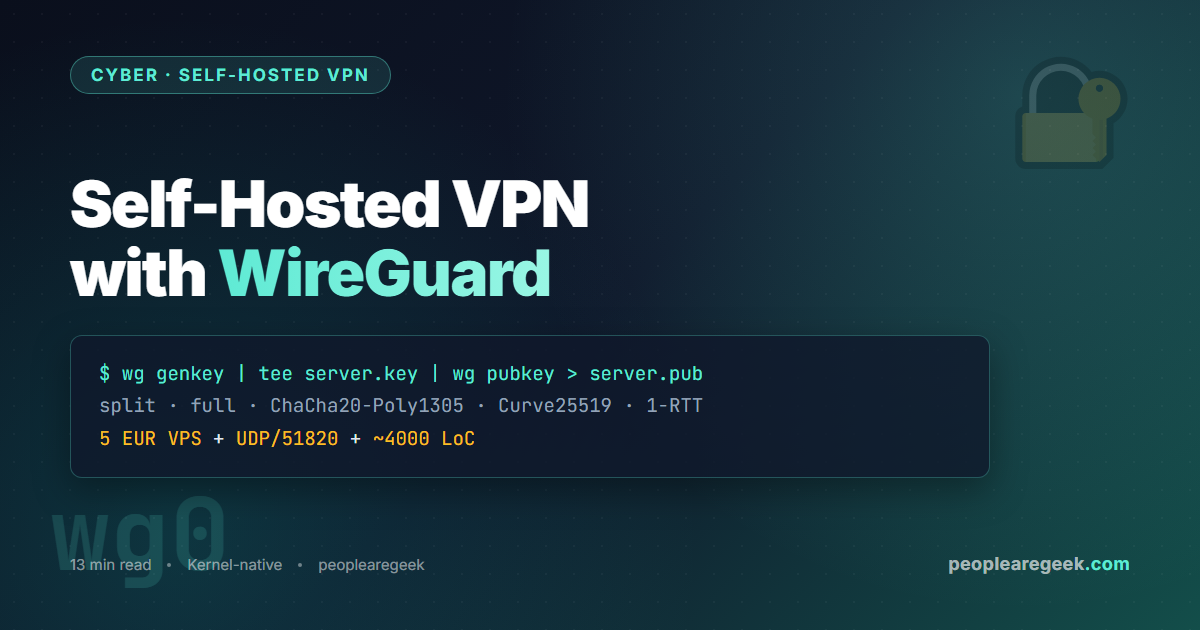
WireGuard runs on under 4 000 lines of kernel code, ships ChaCha20-Poly1305 over UDP, and gives you a working 1-RTT VPN tunnel with a single config file under 20 lines. This guide walks the complete self-hosted setup — server on a 5 EUR VPS, client on Linux / macOS / Windows / iOS / Android — with the two decisions that actually matter (split-tunnel vs full-tunnel, and how to handle dynamic-IP clients behind home NAT), the cryptography under the hood, and the firewall + sysctl + DNS pieces that turn a “works on my laptop” demo into a production-grade always-on tunnel.
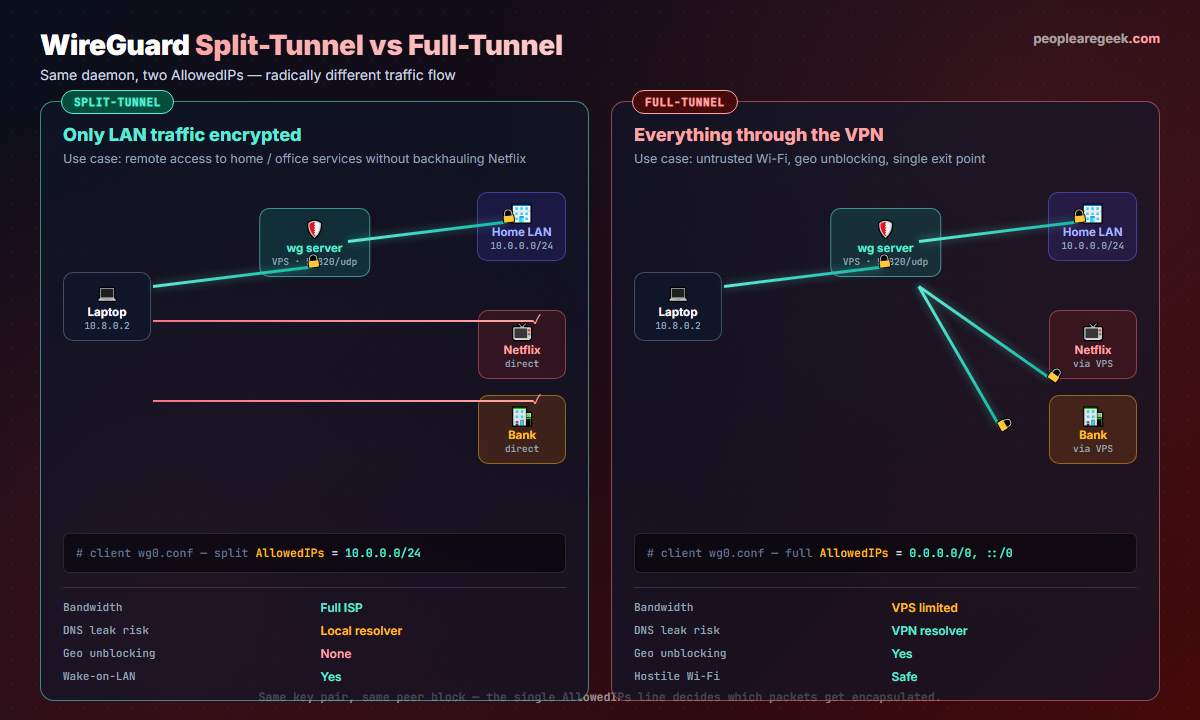
0.0.0.0/0 address space through the VPS, which protects you on hostile Wi-Fi but caps bandwidth at the VPS uplink.Contents
- Why WireGuard, not OpenVPN or IPsec, in 2026
- Pick your topology: split vs full-tunnel
- Step 1: server install (Debian / Ubuntu VPS)
- Step 2: generate keys and write the config
- Step 3: client config on Linux, macOS, Windows, mobile
- Step 4: firewall, NAT and DNS
- Under the hood: the WireGuard handshake
- Hardening and operations
- Common pitfalls
- FAQ
Why WireGuard, not OpenVPN or IPsec, in 2026
Three reasons, in order of how much you will feel them. First, code size: ~4 000 lines for WireGuard, compared to ~600 000 for OpenVPN and ~400 000 for strongSwan / IPsec. Smaller surface, fewer CVEs, easier audits. Second, throughput: because the WireGuard data path runs in the kernel and uses ChaCha20-Poly1305 (which is cheaper than AES on CPUs without dedicated AES-NI hardware), real-world numbers on a small VPS run 2–4 × OpenVPN. Third, roaming: WireGuard binds to a public key, not an IP address, so a client switching from Wi-Fi to LTE keeps the tunnel up without renegotiation. OpenVPN drops, IPsec stutters, WireGuard does not notice.
The trade-off is configurability. WireGuard does not have user / password auth, no certificates, no PKI. You distribute public keys out-of-band like SSH. For a homelab or a small team that is a feature; for a 5 000-seat enterprise it is a reason to look at Tailscale or Cloudflare WARP on top of WireGuard rather than raw WireGuard.
Pick your topology: split vs full-tunnel
Decide before you write a single config line — the entire client config rotates around the answer.
| Question | Split-tunnel | Full-tunnel |
|---|---|---|
| What do you tunnel? | Only the destinations you list (home LAN, internal SaaS, jump host) | Everything, including Netflix and your bank |
AllowedIPs value | 10.0.0.0/24 (or your private range) | 0.0.0.0/0, ::/0 |
| Bandwidth | Full ISP throughput | Capped at VPS uplink |
| DNS leak risk | Local resolver — leaks possible | VPN resolver — by-design private |
| Geo unblocking | No | Yes |
| Best for | Remote access to home / office | Untrusted Wi-Fi, hostile networks |
Mixed setups work too: configure two profiles on the client, switch on demand. The macOS and iOS apps even support per-app routing if you need granular control.
Step 1: server install (Debian / Ubuntu VPS)
Pick any 5 EUR VPS with a clean public IPv4 (Hetzner, OVH, DigitalOcean, Vultr — all fine). Debian 12 or Ubuntu 24.04 LTS, 1 vCPU, 1 GB RAM. Update, install WireGuard, prepare the data dirs.
sudo apt update
sudo apt install -y wireguard wireguard-tools qrencode iptables-persistent
sudo install -d -m 0700 /etc/wireguard
cd /etc/wireguard
WireGuard ships kernel-native on every distro that runs a kernel ≥ 5.6, so there is no daemon to start beyond wg-quick, the systemd unit that brings the interface up from the config file.
Step 2: generate keys and write the config
Two key pairs — one per peer. wg generates Curve25519 keypairs.
# on the server
umask 077
wg genkey | tee server.key | wg pubkey > server.pub
wg genkey | tee client1.key | wg pubkey > client1.pub

# inspect (private keys never leave the machine they were generated on)
ls -l /etc/wireguard/
cat server.pub client1.pub
Write the server config /etc/wireguard/wg0.conf. The interface block lists the server’s private key and the tunnel address. Each [Peer] block lists one client’s public key and the tunnel IPs that client is allowed to send.
[Interface]
PrivateKey = <contents of server.key>
Address    = 10.8.0.1/24
ListenPort = 51820
SaveConfig = false
PostUp     = iptables -A FORWARD -i wg0 -j ACCEPT; iptables -t nat -A POSTROUTING -o eth0 -j MASQUERADE
PostDown   = iptables -D FORWARD -i wg0 -j ACCEPT; iptables -t nat -D POSTROUTING -o eth0 -j MASQUERADE

[Peer]
# laptop
PublicKey  = <contents of client1.pub>
AllowedIPs = 10.8.0.2/32
Enable IP forwarding once on the server, then bring the interface up.
sudo sysctl -w net.ipv4.ip_forward=1
echo 'net.ipv4.ip_forward = 1' | sudo tee /etc/sysctl.d/99-wg.conf
sudo systemctl enable --now wg-quick@wg0
sudo wg show wg0
Step 3: client config on Linux, macOS, Windows, mobile
Client config is one file, same shape on every OS. Below is the split-tunnel version that only routes the home LAN through WireGuard. Swap AllowedIPs for 0.0.0.0/0, ::/0 to make it full-tunnel.
[Interface]
PrivateKey = <contents of client1.key>
Address    = 10.8.0.2/24
DNS        = 1.1.1.1, 9.9.9.9
# DNS        = 10.0.0.1   # use the LAN resolver instead, on split-tunnel

[Peer]
PublicKey           = <contents of server.pub>
Endpoint            = vps.example.com:51820
AllowedIPs          = 10.0.0.0/24, 10.8.0.0/24
PersistentKeepalive = 25
The PersistentKeepalive sends a 32-byte UDP packet every 25 seconds — enough to keep NAT mappings open behind any home router. Drop it on a wired desktop with a public IP; keep it on every laptop and phone.
Per platform:
- Linux: drop the file at
/etc/wireguard/wg0.confandsudo wg-quick up wg0.systemctl enable --now wg-quick@wg0makes it persist. - macOS: install the WireGuard app from the App Store, import the file via “Add Tunnel from File…”. The system keychain stores the private key.
- Windows: WireGuard.exe installer from
wireguard.com, “Add Tunnel” → paste config. The TunSafe-based driver is bundled. - iOS / Android: generate a QR code on the server with
qrencode -t ansiutf8 < client1.confand scan it in the WireGuard mobile app. No retyping.
Step 4: firewall, NAT and DNS
Three pieces have to align: kernel IP forwarding, iptables / nftables NAT, and DNS choices. The server config above already does NAT via POSTROUTING -j MASQUERADE. Two extra rules are worth adding:
- Drop forwarded traffic that does not originate inside the tunnel:
iptables -A FORWARD -i wg0 ! -s 10.8.0.0/24 -j DROP. Stops a misconfigured client from spoofing other peers’ addresses. - Restrict listen port exposure at the cloud provider’s firewall: only UDP 51820 from anywhere. SSH on TCP 22 (or your custom port) only from your management ranges.
For DNS, prefer setting DNS = 1.1.1.1 in the client interface block when you full-tunnel — this avoids the “DNS leak” failure mode where the client OS still queries the local Wi-Fi resolver. On split-tunnel, point DNS at your home resolver (10.0.0.1 or similar) so internal hostnames keep resolving.
Under the hood: the WireGuard handshake
The full handshake fits in two UDP messages and is finished in 1 RTT. Once the symmetric session key is derived, every data packet is sealed in a 16-byte authenticated ChaCha20-Poly1305 envelope.
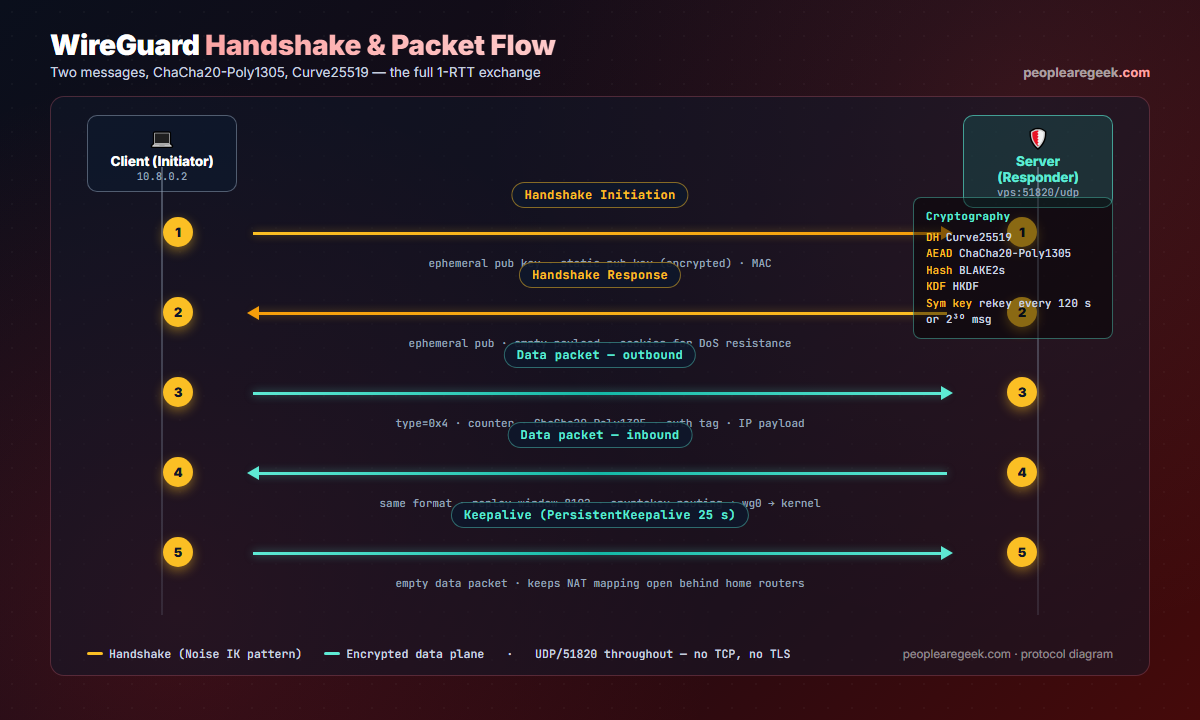
Three properties fall out of this design that no OpenVPN tutorial can match. Peer identity equals public key, period — no DNS, no IP. The protocol is unconditionally silent: an attacker scanning the server port from the wrong source key gets no reply, so port scans cannot fingerprint a WireGuard endpoint. And the kernel data path means you can saturate a gigabit link with one core.
Hardening and operations
- Bind the listener to a public-only address. If the VPS has a private interface for internal traffic, set
ListenPorton the public interface only, via firewall rules. - Watch the kernel counters.
wg showprints last-handshake-at, transfer counters and the configured peers in one go. Cron it every minute, alert if any peer’s last handshake is older than 300 seconds. - Rotate keys yearly. Not because Curve25519 ages, but because key handling discipline does. Reissue all clients on the same day, force the old ones to fail closed.
- Lock down the server. Apply the hardening sysctls from our Linux kernel hardening checklist, especially the network section and
kernel.modules_disabled = 1after boot. - Backups: the keys.
/etc/wireguard/*.keyand the matching.conffiles are the entire VPN. Encrypt them, store off-site. Everything else is reinstalled in five minutes.
Common pitfalls
- NAT mapping died after 25 s. Either no
PersistentKeepaliveon the client, or a stricter router that drops UDP sessions after 15 s. Lower the keepalive to 15. - Tunnel up, no Internet. Either the server is missing
net.ipv4.ip_forward = 1, or the MASQUERADE rule never loaded becauseiptables-persistentis not active. Confirm withiptables -t nat -L POSTROUTING. - DNS leaks on full-tunnel. Many distros keep using
systemd-resolvedstub at127.0.0.53. Either setDNS = 1.1.1.1in the client config and letwg-quickrewriteresolv.conf, or disable the stub. - IPv6 split-horizon. If you set
AllowedIPs = 0.0.0.0/0but forget the::/0counterpart, IPv6 traffic leaks outside the tunnel. Always pair them. - Public IP changes on the VPS. WireGuard does not care, but DNS does. Use a DDNS hostname in the client’s
Endpointrather than a hard-coded IP. - Same private key on two clients. The handshake works for whichever client reaches the server first; the second one gets cryptic timeouts. Always one keypair per peer.
FAQ
How is WireGuard different from Tailscale?
Tailscale uses WireGuard as the data plane and adds a coordination service, identity (SSO), ACLs, NAT traversal via DERP relays, and an admin UI. If you want zero-config peer discovery across a fleet, use Tailscale. If you want one self-hosted server with a handful of clients you control, raw WireGuard is simpler and has no third-party dependency.
Can I run WireGuard on a Raspberry Pi as the server?
Yes, and it works well. A Pi 4 saturates its gigabit NIC running WireGuard. The watch-out is exposing UDP 51820 from the public Internet to your home network — port-forward only that port, and apply the firewall rules in the guide so a misconfigured peer cannot spoof addresses.
Is WireGuard secure against quantum computers?
Curve25519 is not post-quantum, so a future cryptographically relevant quantum computer would break recorded sessions retrospectively. The WireGuard maintainers have a published post-quantum extension and several projects (Mullvad, Cloudflare) layer hybrid PQ KEMs on top today. For 2026 threat models, plain WireGuard remains adequate.
How many peers can a single server handle?
Several hundred without breaking a sweat. The bottleneck is the kernel CPU budget for ChaCha20-Poly1305 — one core easily handles 1 Gbps of aggregated peer traffic. Scaling beyond 1 000 active peers usually means moving to a coordination layer (Tailscale, Netbird) rather than larger raw WireGuard configs.
Does WireGuard work behind carrier-grade NAT (CGNAT)?
Outbound from the client: yes, because the client initiates the UDP session. Inbound: no, the server must have a routable public IP. If both endpoints are behind CGNAT you need a relay (DERP, ZeroTier, the FRP project) or a coordination service like Tailscale.
Can I use one config file for both split and full-tunnel?
No, the client app expects one mode per profile. The clean pattern is two profile files (wg-split.conf, wg-full.conf) and a script that swaps the active one — or, on mobile, two tunnels added to the WireGuard app and toggled in the UI.
Audit the rest of the host
Once the tunnel is up, harden the server itself — 32 sysctl toggles, ready to drop, with per-key gotchas for Docker, Podman and BPF workloads.